
I don't know where it come from or why it won't leave, but for the last 6 months or so I have had an all-consuming obsession with Greek and Mediterranean foods. It seems like all I ever want to eat is grilled meats with lots of lemon, olive oil and herbs, or salads topped with fresh salty feta and garlic-stuffed olives, or soft, warm flatbread wrapped around heavily-seasoned falafel patties topped with yogurt sauce and cucumbers. Seriously I just can't get enough of the stuff.
Most of the time I keep my cravings to myself, because although J enjoys the flavors of the Mediterranean as much as I do, he doesn't necessarily want to eat them every single day. And I can understand that. Sort of. Maybe.
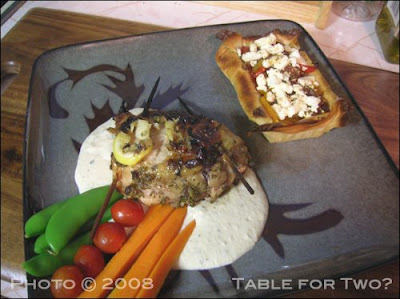
However, during this week's meal-planning session he finally gave me the green light to indulge myself with a light, summery menu of marinated and grilled chicken thighs, hummus, fresh veggies, and a mixed pepper and feta tart. I only had to wait till Tuesday to make it, but its only a slight exaggeration to say it felt like an eternity.
It doesn't end there though. The tart itself was a bit of a treat for me because it gave me an excuse to use some of the brand new, utterly darling mini baking pans that I acquired recently as a birthday gift to myself. A trip to Bowery Kitchen Supply last weekend yielded 4 each rectangular and round mini-tart pans, oval brulees/gratins, and round rammekins, as well as 2 each mini-bundt and springform pans (and I can I just tell you, those springform pans are about the cutest little things I've ever had in my kitchen). Of course, having all these nifty little vessels to work with means that I absolutely HAVE to use them, like, right this very second. What can I say? When I get new things, I need to try them out.
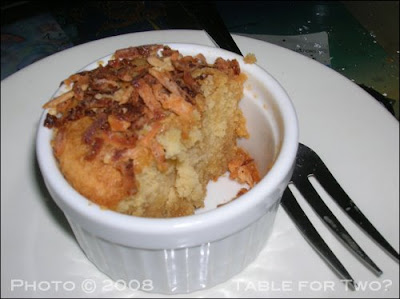
This leads right into the final indulgence of the night - itty bitty personal-sized rum cakes, which is one of J's current obsessions. You see, last summer we joined my family for vacation on St. Thomas in the U.S. Virgin Islands, where we of course enjoyed plenty of good Caribbean rum but also discovered the joy that is the rum-infused cake that is so popular among island tourists. Traditional it may not be, but delicious it most certainly is. Especially when soaked with a syrup made from Cruzan Blackstrap Navy Rum, which has become our new favorite ingredient to experiment with, and topped with black pepper toasted coconut. Sound odd? Maybe, but one forkful will convince you that odd can also be very, VERY good.
The main meal was entirely my own devising, made on (again) a day when I would be home from work and got putter around to my heart's content. That being said, there's no reason you couldn't make it on a busy weeknight with a bit of early prep.
The rum cake was based on this recipe, which I mostly chose because A)it was far simpler than most other recipes I came across, and B)it didn't call for pre-packaged, processed ingredients like boxed cake mix or instant pudding. (Yes, I'm serious - nearly every recipe I saw called for one or the other or both.) Don't get pulled in by those recipes and their promises of easy prep and moist results - this recipe was a breeze to put together and created a dreamily smooth and creamy batter that baked into a dense but moist and delicious cake, made heavenly by a generous soaking in the blackstrap syrup.

Grilled Chicken Thighs with Lemon, Herbs and Hummus-Yogurt Sauce
This chicken benefits from the long marinade in tenderizing citrus, yielding moist, flavorful meat. The hummus-yogurt sauce is just about the simplest thing on earth, especially if you cheat a little bit by using store-bought hummus. Me being me, I made my own, though I'll save that recipe for another post. Do feel free to use your own favorite recipe though - the only important thing is that its nice and smooth so that the resulting sauce has a nice, velvety texture.
2 large chicken thighs, bone-in and skin-on, trimmed of excess skin and fat (if you break down your own bird you probably won't need to worry about this)
Finely grated zest and juice of one lemon, plus 4 wafer-thin slices of a second (I used a meyer lemon for the slices because I like the subtle, floral flavor and scent in this sort of application, but I'm sure a regular lemon would work just fine)
2 cloves of garlic, grated or finely minced
1 tbsp each finely chopped fresh rosemary, parsley, and oregano
1/2 tsp each kosher salt and black pepper
1/2 cup extra-virgin olive oil
sturdy toothpicks or bamboo skewers
1/2 cup each hummus and greek yogurt
1/2 tsp black pepper
Fresh veggies for serving (I chose blanched carrot sticks, sugar snap peas, and fresh cold grape tomatoes)
Combine the lemon zest and juice, garlic, herbs, salt, pepper, and olive oil in a bowl and stir well with a fork or whisk to combine. Set aside.
With your fingers, gently loosen the skin of the chicken thighs to create sort of a pocket between the skin and the meat. Slide two slices of lemon beneath the skin, and use the toothpicks or skewers to reattach the skin to the meat on the edges. I used 2 bamboo skewers per thigh, using a sharp knife to score and break them in half so their length wouldn't make them awkward to handle.
Place the thighs in a shallow dish and pour over the marinade, turning to coat on all sides. Cover with plastic wrap and place in the fridge to marinate for 4-8 hours.
When you're ready to cook the chicken, fire up your grill. We use charcoal, partially because we honestly can't afford a big gas grill but also because I just don't think that the flavor and smell of charcoal-grilled foods can be replicated with propane. Obviously you can use a gas grill if that's what you've got, or even a grill pan on top of the stove, if the weather's nasty or you don't have an outdoor grill. But I'm telling you, the charcoal-fueled open flame cooking method really made this dish.
Once your grill rack is good and hot, place the chicken thighs on the rack skin-side down and cook for 7-8 minutes, then flip and cook on the opposite side for another 7-8 minutes or until the juices run clear. (J, the grill master, would be able to give more detailed instructions on hwo to get just the right amount of charred, smoky goodness on your meat, but as he's currently busy practicing his Rock Band drumming I think he'll have to take a rain check on that little bit of instruction.)
Remove the thighs from the grill, wrap in aluminum foil, and set aside to rest for 5 minutes or so to let the juiced redistribute while you prepare the sauce. And by "prepare the sauce" I simply mean to mix together the hummus, yogurt, and pepper until evenly combined. There, wasn't that easy?
To serve, spoon a generous dollop of the sauce onto a plate and spread into a nice bed for your chicken and veggies. Arrange the veggies on the side of the sauce in an attractive manner, and nestle the chicken right in the middle of the sauce. Every bite of the chicken will come with a blanket of the smooth, tangy sauce. Cue the toe-curl and back-of-the-throat moans of pleasure.

Mixed Pepper and Feta Tart
6 sheets of phyllo dough
2 tbsp melted butter
1 tbsp olive oil
1 cup julienned red, yellow, and orange bell peppers
1/2 cup thinly sliced red onion
1 clove of garlic, finely minced
1 tsp chopped fresh oregano
1/2 tsp sugar
1 tbsp balsamic vinegar
2 tbsp crumbled feta cheese
S&P to taste
If you've ever worked with phyllo dough, you probably know the drill here - layer the phyllo one sheet at a time, brushing a thin layer of melted butter over each layer before topping with the next. Then cut the whole thing in half width-wise (is that even a word?) and lay one half over the other to double the thickness. Cut this in half width-wise again to create two even portions for your crust. (Normally you probably wouldn't use so many layers, but since the tart filling would be a bit on the liquidy side I wanted to be sure it'd be sturdy.
Gently lift and press the dough pieces into two mini rectangular removable-bottom tart pans. There will probably be some overhang, and that's fine. Feel free to shape the edges prettily - I was impatient so I didn't bother.
Bake the shells in a 325 degree oven for about 15 minutes until just golden brown and puffed sligthly. Remove from oven and set aside while you prepare the filling.
Heat 1 tbsp olive oil in a medium skillet, then add the peppers, onions, and garlic. Sautee until they just begin to soften, then add the vinegar, sugar and oregano and cook until they begin to caramelize. Remove from heat and add salt and pepper to taste.
Divide the filling between the two tart shells and top each with 1 tbsp of feta. Switch the oven to broil and place the tart pans on a baking sheet. Place under the broiler and cook until the feta starts to toast and get golden brown on top and the edges of the crust get dark - shouldn't take more than a minute or two. Remove from the oven and set aside until cool enough to handle. To serve, simply support the bottom of the pan and push upward to remove the ring from the outside, then gently slide the bottom from the tart and place on the plate (careful, phyllo is delicate stuff!)
Mmmmm, dessert.
As for the rum cake, all you really need to do is follow the recipe that I linked to earlier. If you want the exact results I got though, I recommend using a good quality amber rum in the cake, and make the syrup with half amber rum and half Cruzan Blackstrap. If you've never tasted really good Navy rum, man oh man are you missing out - its warm and toasty with very heavy flavors of maple and molasses, and though it could be a little overwhelming on its own, it provides just the right deep, dark note to this otherwise lightly-colored cake.
I also added some vanilla and coconut extracts to the cake itself and used equal parts white and light brown sugar rather than all white, but that's not at all necessary. I also baked four small rammekins-worth of batter for individual portions for J and I, and poured the rest into a 9" square baking pan for J to bring to work today - the rammekins took about 45 mins to bake, while the pan took about an hour and 15 minutes.
The coconut topping is incredibly simple but shockingly complex in flavor - just take some sweetened flakes coconut, the kind you get in a bag in the baking supplies section f the grocery store, and toast it up in a pan with a couple shakes of finely ground black pepper. Sprinkle it over the cake before serving and dig in!
Most of the time I keep my cravings to myself, because although J enjoys the flavors of the Mediterranean as much as I do, he doesn't necessarily want to eat them every single day. And I can understand that. Sort of. Maybe.
However, during this week's meal-planning session he finally gave me the green light to indulge myself with a light, summery menu of marinated and grilled chicken thighs, hummus, fresh veggies, and a mixed pepper and feta tart. I only had to wait till Tuesday to make it, but its only a slight exaggeration to say it felt like an eternity.
It doesn't end there though. The tart itself was a bit of a treat for me because it gave me an excuse to use some of the brand new, utterly darling mini baking pans that I acquired recently as a birthday gift to myself. A trip to Bowery Kitchen Supply last weekend yielded 4 each rectangular and round mini-tart pans, oval brulees/gratins, and round rammekins, as well as 2 each mini-bundt and springform pans (and I can I just tell you, those springform pans are about the cutest little things I've ever had in my kitchen). Of course, having all these nifty little vessels to work with means that I absolutely HAVE to use them, like, right this very second. What can I say? When I get new things, I need to try them out.
This leads right into the final indulgence of the night - itty bitty personal-sized rum cakes, which is one of J's current obsessions. You see, last summer we joined my family for vacation on St. Thomas in the U.S. Virgin Islands, where we of course enjoyed plenty of good Caribbean rum but also discovered the joy that is the rum-infused cake that is so popular among island tourists. Traditional it may not be, but delicious it most certainly is. Especially when soaked with a syrup made from Cruzan Blackstrap Navy Rum, which has become our new favorite ingredient to experiment with, and topped with black pepper toasted coconut. Sound odd? Maybe, but one forkful will convince you that odd can also be very, VERY good.
The main meal was entirely my own devising, made on (again) a day when I would be home from work and got putter around to my heart's content. That being said, there's no reason you couldn't make it on a busy weeknight with a bit of early prep.
The rum cake was based on this recipe, which I mostly chose because A)it was far simpler than most other recipes I came across, and B)it didn't call for pre-packaged, processed ingredients like boxed cake mix or instant pudding. (Yes, I'm serious - nearly every recipe I saw called for one or the other or both.) Don't get pulled in by those recipes and their promises of easy prep and moist results - this recipe was a breeze to put together and created a dreamily smooth and creamy batter that baked into a dense but moist and delicious cake, made heavenly by a generous soaking in the blackstrap syrup.
Grilled Chicken Thighs with Lemon, Herbs and Hummus-Yogurt Sauce
This chicken benefits from the long marinade in tenderizing citrus, yielding moist, flavorful meat. The hummus-yogurt sauce is just about the simplest thing on earth, especially if you cheat a little bit by using store-bought hummus. Me being me, I made my own, though I'll save that recipe for another post. Do feel free to use your own favorite recipe though - the only important thing is that its nice and smooth so that the resulting sauce has a nice, velvety texture.
2 large chicken thighs, bone-in and skin-on, trimmed of excess skin and fat (if you break down your own bird you probably won't need to worry about this)
Finely grated zest and juice of one lemon, plus 4 wafer-thin slices of a second (I used a meyer lemon for the slices because I like the subtle, floral flavor and scent in this sort of application, but I'm sure a regular lemon would work just fine)
2 cloves of garlic, grated or finely minced
1 tbsp each finely chopped fresh rosemary, parsley, and oregano
1/2 tsp each kosher salt and black pepper
1/2 cup extra-virgin olive oil
sturdy toothpicks or bamboo skewers
1/2 cup each hummus and greek yogurt
1/2 tsp black pepper
Fresh veggies for serving (I chose blanched carrot sticks, sugar snap peas, and fresh cold grape tomatoes)
Combine the lemon zest and juice, garlic, herbs, salt, pepper, and olive oil in a bowl and stir well with a fork or whisk to combine. Set aside.
With your fingers, gently loosen the skin of the chicken thighs to create sort of a pocket between the skin and the meat. Slide two slices of lemon beneath the skin, and use the toothpicks or skewers to reattach the skin to the meat on the edges. I used 2 bamboo skewers per thigh, using a sharp knife to score and break them in half so their length wouldn't make them awkward to handle.
Place the thighs in a shallow dish and pour over the marinade, turning to coat on all sides. Cover with plastic wrap and place in the fridge to marinate for 4-8 hours.
When you're ready to cook the chicken, fire up your grill. We use charcoal, partially because we honestly can't afford a big gas grill but also because I just don't think that the flavor and smell of charcoal-grilled foods can be replicated with propane. Obviously you can use a gas grill if that's what you've got, or even a grill pan on top of the stove, if the weather's nasty or you don't have an outdoor grill. But I'm telling you, the charcoal-fueled open flame cooking method really made this dish.
Once your grill rack is good and hot, place the chicken thighs on the rack skin-side down and cook for 7-8 minutes, then flip and cook on the opposite side for another 7-8 minutes or until the juices run clear. (J, the grill master, would be able to give more detailed instructions on hwo to get just the right amount of charred, smoky goodness on your meat, but as he's currently busy practicing his Rock Band drumming I think he'll have to take a rain check on that little bit of instruction.)
Remove the thighs from the grill, wrap in aluminum foil, and set aside to rest for 5 minutes or so to let the juiced redistribute while you prepare the sauce. And by "prepare the sauce" I simply mean to mix together the hummus, yogurt, and pepper until evenly combined. There, wasn't that easy?
To serve, spoon a generous dollop of the sauce onto a plate and spread into a nice bed for your chicken and veggies. Arrange the veggies on the side of the sauce in an attractive manner, and nestle the chicken right in the middle of the sauce. Every bite of the chicken will come with a blanket of the smooth, tangy sauce. Cue the toe-curl and back-of-the-throat moans of pleasure.
Mixed Pepper and Feta Tart
6 sheets of phyllo dough
2 tbsp melted butter
1 tbsp olive oil
1 cup julienned red, yellow, and orange bell peppers
1/2 cup thinly sliced red onion
1 clove of garlic, finely minced
1 tsp chopped fresh oregano
1/2 tsp sugar
1 tbsp balsamic vinegar
2 tbsp crumbled feta cheese
S&P to taste
If you've ever worked with phyllo dough, you probably know the drill here - layer the phyllo one sheet at a time, brushing a thin layer of melted butter over each layer before topping with the next. Then cut the whole thing in half width-wise (is that even a word?) and lay one half over the other to double the thickness. Cut this in half width-wise again to create two even portions for your crust. (Normally you probably wouldn't use so many layers, but since the tart filling would be a bit on the liquidy side I wanted to be sure it'd be sturdy.
Gently lift and press the dough pieces into two mini rectangular removable-bottom tart pans. There will probably be some overhang, and that's fine. Feel free to shape the edges prettily - I was impatient so I didn't bother.
Bake the shells in a 325 degree oven for about 15 minutes until just golden brown and puffed sligthly. Remove from oven and set aside while you prepare the filling.
Heat 1 tbsp olive oil in a medium skillet, then add the peppers, onions, and garlic. Sautee until they just begin to soften, then add the vinegar, sugar and oregano and cook until they begin to caramelize. Remove from heat and add salt and pepper to taste.
Divide the filling between the two tart shells and top each with 1 tbsp of feta. Switch the oven to broil and place the tart pans on a baking sheet. Place under the broiler and cook until the feta starts to toast and get golden brown on top and the edges of the crust get dark - shouldn't take more than a minute or two. Remove from the oven and set aside until cool enough to handle. To serve, simply support the bottom of the pan and push upward to remove the ring from the outside, then gently slide the bottom from the tart and place on the plate (careful, phyllo is delicate stuff!)
Mmmmm, dessert.
As for the rum cake, all you really need to do is follow the recipe that I linked to earlier. If you want the exact results I got though, I recommend using a good quality amber rum in the cake, and make the syrup with half amber rum and half Cruzan Blackstrap. If you've never tasted really good Navy rum, man oh man are you missing out - its warm and toasty with very heavy flavors of maple and molasses, and though it could be a little overwhelming on its own, it provides just the right deep, dark note to this otherwise lightly-colored cake.
I also added some vanilla and coconut extracts to the cake itself and used equal parts white and light brown sugar rather than all white, but that's not at all necessary. I also baked four small rammekins-worth of batter for individual portions for J and I, and poured the rest into a 9" square baking pan for J to bring to work today - the rammekins took about 45 mins to bake, while the pan took about an hour and 15 minutes.
The coconut topping is incredibly simple but shockingly complex in flavor - just take some sweetened flakes coconut, the kind you get in a bag in the baking supplies section f the grocery store, and toast it up in a pan with a couple shakes of finely ground black pepper. Sprinkle it over the cake before serving and dig in!


