Showing posts with label pasta/grains. Show all posts

Thursday, February 19, 2009

Barefoot Bloggers: Real Spaghetti and Meatballs

It seems ironic, in an admittedly Alanis-Morrisette-kind-of-way, that after having spent a week waxing poetic about the glories of non-traditional meatballs and straight-up dissing standard Italian-American spaghetti and meatballs, the first of this month's Barefoot Bloggers challenges would be just that. Touche, fate. You win this time.

Really, there is absolutely nothing wrong with basic spaghetti and meatballs, at least not when they are made right. I've certainly enjoyed quite a few plates in my time. There's just something homey and comforting about this dish that I think makes everyone feel just a little bit childlike at heart, no matter what their age. As Ina would say, how bad can that be?

And so, I will admit to approaching this recipe with quite a bit of excitement. Any excuse to eat pasta and red sauce is a-ok with me, and when you start throwing ground meat around too? Sign me up.


Super Meatball Scooping Action Shot! Just want to insert here that of all the invaluable tips and tricks I've picked up from the great Alton Brown, using an ice cream scoop (or disher, as he calls it) to evenly portion out things like meatballs, muffin batter, and really anything other than ice cream, is one of my favorites. Probably a close second to brining just about any meat that isn't beef before cooking. You're my hero AB!


As usual, I made a few small changes to Ina's recipe. For the meatballs, Ina calls for a 4-1 ratio of fresh white bread crumbs and dried seasoned breadcrumbs to be added to the meat mix; I didn't realize until the night I made this that I was out of dry bread crumbs, so I just used extra fresh crumbs and tossed in a bunch of dry italian spices (granulated garlic and onion, some parsley and oregano) to compensate for the missing seasoning. I also soaked my breadcrumbs in a bit of milk for 10 minutes, then pulsed them in the food processor with the egg to make sort of a paste which I then added to the meat mix. I can't remember where I picked up this trick, but it invariably creates a more moist, tender meatball with none of the mealiness that you sometimes get with just ground meat and dry breadcrumbs. I just really like the texture when they're made this way. It also saves me from having to remove the crust from my bread, which would have been particularly difficult considering I made my crumbs from a soft semolina roll rather than slices of white sandwich bread.


Mmm, golden brown deliciousness.


I also adjusted the basic meat proportions, using an even 1-1-1 ratio of beef, pork, and veal, where Ina called for twice as much beef as pork and veal. I'm pretty sure I had just under a pound of each, because that just happened to be the size of the pre-packed meatloaf mix they were selling at the grocery store. Don't worry, the finished meatballs were still sufficiently beefy.


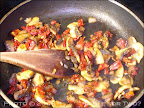
The sauce recipe that Ina pairs with the meatballs seemed a little boring, so I amped it up a little with some fresh torn basil leaves and a handful of chopped sundried tomatoes for sweetness. I also pureed the sauce with my stick blender after cooking, because I prefer a smooth sauce with long noodles - chunky sauces, in my world, are relegated to short cuts of pasta like penne, gemelli, or rotini.

Finally, I used some fresh linguine in place of the usual dry spaghetti, mostly because I'd bought some on a whim at this great natural/organic market that we discovered on the weekend's trip to Huntington. I used the cooked pasta to create sort of a nest on each plate, perched three steaming hot meatballs on top, and finished with a ladle of sauce and a generous grating of parmesan.


All in all, I have to say that this was pretty much what I want and expect from a plate of spaghetti and meatballs. The flavors weren't terribly complex or exciting, but they WERE delicious. The bread-milk-egg slurry in the meatballs did its job well, as they were indeed moist and tender and not the least bit mealy. Next time I would make them a bit smaller, as Ina's 2" round specimens didn't quite cook all the way through in the time indicated. The sauce was certainly not the best I've ever had, but it served its purpose and paired quite well with the richly-flavored meatballs and salty parmesan. It was a bit too thick for my tastes, even after blending, and I wish I'd thinned it out with some beef stock and tomato juice or puree afterwards.


Oddly enough, the only real off note in the meal was the pasta - I just wasn't thrilled with it. This particular brand had a strange aftertaste that I found unpleasant, and I had to be sure to have a little bit of sauce and meat on every bite of pasta to cover it up. The texture was perfect, as is usually the case with fresh pasta, but I would never be able to eat this pasta with anything less than a robust sauce or ragu, so I don't think its worth the money. I'll just have to try another brand, or (gasp!) finally get around to making some myself.


Ooh, you saucy noodles you.


In the end, though, I really enjoyed this. On a cold and gray winter Monday, after a long day of work, a dinner of spaghetti and meatballs was more than welcome. The meal was warm and soothing and evoked more than a little bit of nostalgia for my childhood, and I know I was smiling a little on the inside as I ate.

The best part is that we now have a big tupperware container of meatballs and sauce in the freezer. (Even making the meatballs large, I must have gotten around 16 meatballs out of my mix, and since J and I only ate 3 apiece, that left a LOT of leftovers.) So someday soon, when we have another cold and dreary day, I can take them out and fix up the sauce to get it just right, and serve it over some better pasta, and we'll have yet another spaghetti and meatballs dinner that'll be even better than the first.

Thanks to BMK of Reservations Not Required for this great recipe selection!

Wednesday, December 31, 2008

Goodness, gracious, great balls o' meat! (Part 2)

I have to admit to being mildly skeptical about this recipe, which is part of the reason that we didn't make it in the same week that we made all of our other meatball-centric meals. I'm a little wishy-washy when it comes to game meats; I like a little gaminess, but I've even had lamb that's been too strong for my tastes, and venison that has been hunted in the wild is much stronger than any farm-raised lamb. I was afraid that this dish, which used up the remainder of a windfall of free deer meat given to us by our old butcher last year, would be exceptionally gamey and unpleasant.

I am pleased to report that I could not have been more wrong.

This was, hands down, the best meal we'd made in weeks, and we are now mourning the fact that don't have access to more venison so that we could make this again.


I'm sorry to say that this was not our original recipe - J did some searching on the internet for meatball recipes using venison and came up with this one, which blended the venison with beef and had them served in a dried cherry and red wine sauce. I thought that sounded pretty good, though in addition to being concerned about the gaminess, I was worried that the sauce would be exceptionally sweet. I needn't have worried about that either - the sauce was a perfect balance of sweet and savory with just a hint of tang, the sort of flavor that just makes you salivate and crave another bite. And when paired with the ultimately mild but distinctive flavor of the venison, these were just about perfect.

J took charge of this recipe, and made a few small changes - his altered version is below. The recipe for my side dish, a warm farro salad with young kale and white beans that turned out to be the perfect earthy counterpoint to the sweet and savory meatballs, follows as well.


---------------------------------

Venison Meatballs in Dried Cherry Sauce
Adapted from this recipe on MyRecipes.com, originally from Christmas with Southern Living, 2000

The original recipe was supposed to make about 4 dozen 1" meatballs. J halved the recipe and made them slightly larger, and we probably got about a dozen or so (which was far too much for dinner but meant we had leftovers that tasted even better the next day). You can make them any size you like - simply adjust your cooking time accordingly.

Meatballs:
1/2 lb ground venison
1/2 lb ground pork
1 tsp salt
1 tsp freshly ground pepper
3/4 tsp ground allspice
1/8 cup minced onion
3 cloves garlic, minced
1 tsp chopped fresh thyme
1 beaten egg
olive oil

Sauce:
1/2 cup chopped onion
1/4 cup chopped celery
2 cloves garlic, chopped
4-5 oz dried cherries (about 3/4 cup)
1 bay leaf
3 whole black peppercorns
1 sprig fresh thyme
1/2 cup Merlot
1 1/2 tbsp balsamic vinegar
1 1/2 cups beef stock

Place ground venison and pork in a large bowl with salt, pepper, allspice, onion, garlic, thyme, and egg. Mix with your hands, being careful not to overwork the meat to ensure a good texture once the meatballs are cooked. Shape mixture into 1.5-2" meatballs.

Heat olive oil in a large skillet over medium-high heat until just shy of smoking, then add the meatballs and sear well on all sides by occasionally shaking the pan to roll them around. Use tongs or a slotted spoon (tongs work better with larger meatballs) to remove the meatballs when they are nice and browned and reasonably firm - you don't need to worry too much about cooking them all the way through here, as they'll finish cooking in the sauce later. Place on a plate or in a bowl and cover with foil to trap them in their own radiant heat, as this will also help them to finish cooking.

Add chopped onion, celery and garlic to the pan and sautee them in the remaining oil and pan drippings until softened and barely colored - keep the veg moving to avoid burning the garlic. Add chopped garlic; cook 30 seconds. Turn the heat down a bit and add the cherries, bay leaf, peppercorns, thyme, wine, and balsamic vinegar, using a wooden spoon to scrape up all the browned bits from the bottom of the pan. Bring mixture to a boil and reduce by half, then add the stock and reduce by half again. Remove from heat and discard bay leaf and thyme.

You want to blend this sauce to a smooth consistency, so use whatever method works best for you. We used our regular blender but if you have a stick blender you could also pour the sauce into a tall container and use that (next time, that's what we'll do - I hate using the regular blender for this stuff). Just a few tips if you use an electric blender: When you put the to on, make sure that one of the openings is fcing the pour spout so that there is a place for steam to escape, and place a towel over the top while you blend. Blending hot liquids can be an explosive ffair if you aren't careful, and once you've had searing hot half-pureed fod go flying around your kitchen once, you never want it to happen again.

Once the sauce is blended, you can push it through a wire mesh strainer if you like, but we didn't bother. Return the sauce to the pan and add the meatballs back in. Roll them around to coat in the sauce and let everything simmer together for a few minutes to ensure even heating and thorough cooking of the meatballs. If serving individual portions, these can be skewered on bamboo skewers or simply placed on a plate with n extra spoonful of sauce. If serving as a group appetizer or a party dish, pour all the meatballs and sauce into a chafing dish or large fondue pot to keep warm and provide toothpicks for self-service. They'll be the best sweet and-sour cocktail meatballs you've ever eaten.


---------------------------------

Warm Farro Salad with White Beans and Young Kale

Young kale is paler green and has smaller leaves than the full-grown kind, and has a milder, slightly less bitter flavor. Use only the curly leaves, discarding the stems. If you can't find young kale, regular will work just fine.

I actually think that this would be equally good at room temperature or even cold, especially if dressed with a simple lemon vinaigrette after chilling, but as I haven't tried that yet myself you'll have to let me know how it turns out.

1/2 cup farro, rinsed and soaked in cold water for 30 minutes
1 1/2 - 2 cups chicken stock (standard ratio for cooking farro is 1 part farro to 3 parts liquid, but I always find I need slightly more, so I start with a cup and a half and add more later if necessary)
1 tbsp red wine vinegar
1 tbsp good extra virgin olive oil
1/4 cup minced white onion
2 minced garlic cloves
2/3 cup canned white beans such as navy or cannelini, drained and rinsed
1 cup roughly chopped young kale, well rinsed
salt & black pepper
freshly grated romano, parmesan, prima donna (our choice, as usual), or other hard, salty cheese, optional

Place 1 1/2 cups of the chicken stock in a medium saucepan and bring to a boil over high heat, then drain the farro and add to the pan. Reduce the heat to medium, cover the pan, and simmer until the farro has absorbed all the water and is tender but still slightly chewy, usually about 20 minutes. You may want to stir it around every so often to keep it from sticking. If you find that the farro absorbs all of the stock but is still a little hard, just add more stock a little bit at a time and continue to simmer uncovered until it is properly cooked. This may take some nitpicking, but you'll get it.

While the farro cooks, heat a bit of olive oil in a small sautee pan over medium heat and add the onions and garlic. Cook together, stirring frequently, until well softened and golden brown - we're going for some slight caramelization here. Add in the kale and white beans along with a tablespoon or so of water, reduce the heat to low, and sautee until the kale has wilted and softened and the beans are exceedingly tender. Set aside.

When the farro is cooked, drain any excess liquid that there may be in the pan (I never have any, but you never know) and gently stir in the kale and beans mixture along with the red wine vinegar, good EVOO, and salt and pepper to taste. Add some grated cheese if you like. We did like, and even added a few extra slices of prima donna to our plates to nibble between bites of meatball and farro - it worked. Really well. Cover the pan and remove from heat to keep warm, but not hot, until ready to serve.

Thursday, September 11, 2008

Barefoot Bloggers: Grown-Up Mac and Cheese

This is my first month as a member of the Barefoot Bloggers, and the first recipe this month was Ina's Grown-Up Mac and Cheese, chosen by Heather of Randomosity and the Girl. I love love LOVE mac and cheese, and grew up eating the homemade baked variety rather than the ever popular blue box, so I must admit a bias toward this sort of recipe. I made a few adjustments to the original recipe to make it just a bit healthier, but it was truly delicious and extremely satisfying paired with some sauteed sugar snap peas and green beans for dinner last night. Great choice Heather!

The original recipe called for gruyere, sharp cheddar, and a blue cheese (Ina specifically recommends roquefort) and an addition of crisp bacon. I replaced the gruyere with my beloved prima donna, which I've always likened to sort of a combination of swiss and parmesan - salty and tangy, hard but not crumbly with a smooth mouthfeel, and in my experience quite meltable - and used a fairly high quality stilton for the blue cheese. I also skipped the bacon in favor of a rather healthier combination of sauteed white button mushrooms, sundried tomatoes, and red onions. Finally, I made my standard substitution of whole wheat elbow macaroni for regular white pasta (hence the dark color in my finished dish). Interesting to note, I recently discovered that Hodgson Mills, my favorite specialty flour producer, also sells whole wheat pasta that is quite tasty.

Otherwise I followed the recipe technique almost exactly, and although it was nothing new for me, as I make mac and cheese with basically this method all the time, it came out extremely well.


Partial mis en place - white button mushrooms, diced sundried tomatoes and red onions, whole wheat pasta, and cheeses.


I started by getting some salted water heating on the stove while dicing up the sundried tomatoes and red onions and thinly slicing the mushrooms. When the water came to a rolling boil, I dumped in the pasta and gave it a stir to keep it from sticking.


Taking action shots is hard!


Then I shredded the prima donna and cheddar and crumbled the stilton - I used rather less of the stilton in proportion to the other cheeses than the recipe called for, because I'm just not that fond of blue cheese. I probably used half what the recipe called for.


While the pasta finished cooking, I heated some olive oil in a small skillet and sauteed the mushrooms, sundried tomatoes, and onions with a bit of salt and chicken broth until they were softened and any liquid in the pan had evaporated, allowing them to caramelize just a bit. These I set aside until it was time to assemble the final casserole.

I cooked the pasta about 5 minutes so that it would be just slightly underdone, wanting it to finish cooking in the oven so it would soak up all the flavors of the cheese and veg.


One of the complaints many of the Barefoot Bloggers seem to have about this recipe is the number of pots, pans, and tools required to make this dish. But with a little thought, its pretty easy to cut down on the number of dishes necessary. For example, the recipe directs you to scald the milk in a small saucepan. But I see no reason to do that - why not just microwave it in the measuring cup? All you're really looking to do is warm it through so that it thickens evenly when added to the roux (equal parts flour and butter). And if you're patient enough to take your time with things, you can use the same pan that you used to cook the pasta to make the sauce - just wait till the pasta is cooked and drained, the rinse out the pot and put back on the heat to make the roux. Right there you've knocked out two dirty pots.

Anyway, once the pasta was draining in a colander I got the roux started - 1 tbsp each flour and melted butter, cooked for just a minute or so to cut down on the raw flour taste - I added the warmed milk slowly and stirred with a whisk to get rid of any potential lumps. This mixture cooked for a minute or two until it started to thicken, then was removed from the heat. I added in the cheese mixture in 3 parts, whisking well after each addition to ensure that the cheese melted, creating a smooth, thick cheese sauce. Once all the cheese was melted I added some freshly cracked black pepper and a bit of freshly grated nutmeg, and a shake of garlic powder because I never make anything savory without garlic.

Once the sauce was done I stirred in the pasta and sauteed veg, then divided the resulting mixture evenly between 4 small casserole/brulee dishes.

Another note here: the original recipe claimed it would serve two, and I knew I wanted to have this along with some green veg for dinner, so I halved it, expecting to end up with two appropriately sized side-dish portions. I ended up with twice that much, which tells me that the original recipe would easily serve four for dinner as a main course. I can't imagine the appetite that would allow a single person to eat the entirety of the amount I ended up with... it was a LOT of macaroni. Not that I'm complaining, because it meant both J and I got to have an especially yummy lunch today, but it seems like a rather major flaw in the original recipe.


I think this may be the best food photo I've taken yet. Just looking at it makes me smile.


The casseroles were placed on a baking sheet for easy movement, then topped with a mixture of plain dry bread crumbs and dry thyme, as I was lacking the fresh basil that the recipe called for and was frankly too lazy to process my own soft bread crumbs. The baking sheet was slid into a 400 degree oven to bake for approximately 20 minutes (adjusted from the original 35-40 mins to account for the much smaller dish size) while we enjoyed a glass of Barefoot Vineyards Cabernet Sauvignon (appropriate, no?) and prepped our green bean/snap pea side dish.


The smell while these things were cooking was fantastic, and when the oven timer beeped I opened the door to reveal some beautifully golden-brown dishes of deliciously aromatic mac-and cheese. It was all we could do to let them rest and cool down for 5 minutes while we finished the veg accompaniment.


Now, while I can imagine that the original, unaltered recipe would be delicious (because I absolutely love gruyere, and everyone knows that bacon makes everything better), this was the most satisfying mac and cheese I've made in awhile. The flavor was very well balanced between the sweet sundried tomatoes and onions, earthy mushrooms, and salty/tangy cheese, and texturely it was perfect, crispy topping hiding a smooth, creamy interior. J expressed that he would have liked a more pronounced blue cheese flavor, which undoubtedly would have come through had I kept to the original cheese proportions, and unfortunately I think the identity of the prima donna was lost aong the other flavors, but the cheesiness as a whole was delightfully sharp and well-rounded. Grown-up mac and cheese, indeed! I can't imagine many kids who would appreciate this dish for what it was.

Thank goodness I'm a grown-up.


Man, I wish I had some more of this right now... good thing for my waistline that its all gone!


Would I make this again? Absolutely. But then, as I said, this wasn't all that different from my standard mac and cheese technique, which I have always loved. I just wish I could allow myself to make it more often, because this really was the epitome of comfort food to me.

I definitely recommend the vegetarian substitutions I made here though - even an adamant meat-eater like J didn't miss the bacon in this, though we both agreed that the addition of any pork product would just about throw this dish into the stratosphere.

I would like to try a similar dish with almost entirely prima donna - we made a fondue with it once and it was out of this world, so I can't imagine what it would be like as the sole cheese in mac and cheese - and would also like to experiment with other add-ins (chicken and peas perhaps? Or maybe sausage and peppers, especially if some parmesan and shredded mozzarella got added to the recipe). Or on a slightly weirder vein, I've got some fresh pumpernickel bread crumbs that I think would make a lovely mac and cheese topping... imagine the cheese sauce made with sharp cheddar and beer and mixed with some diced kielbasa and drained sauerkraut. I love German-inspired food, and this simply must be tried.

But that's the beauty of a dish like this - infinite possibilities for variation, and infinite ways to adjust the recipe to suit your tastes. Really, its not so much a recipe as a technique, and once you learn that technique, you could do almost anything.

I love that kind of recipe.

Next up for the Barefoot Bloggers: Cream of Wild Mushroom Soup!

Sunday, August 10, 2008

Gazpacho and Sesame Chicken (but not the way you think)

For the second time in two weeks, we're eating Greek here at "Table for Two?". Well, sort of.

I won't pretend for a millisecond that there is anything traditional or authentic about this meal. Its got a little bit of an identity crisis going on. "Gazpacho... isn't that a Mexican soup?" Well, yes, but this one isn't. "Sesame chicken? Sounds like Chinese takeout." It does, doesn't it? But its not. "You're calling this Greek? I've never seen a Greek meal like that." No, I'd imagine you wouldn't have, but wait, just WAIT till you taste it.


Lets start with the chicken, shall we? Really, this couldn't be simpler. J was inspired by a recipe for "Tahini Turkey Thighs" in the Better Homes & Gardens New Grilling Book, a birthday gift from my parents last year. Their recipe was heavily influenced by Asian cuisine and called for things like soy sauce and rice vinegar, which I'm sure would be good as well but wasn't what we were in the mood for. So he simplified the recipe significantly and made a few subtle changes to swing the dish around from Asia to the Mediterranean, ending up with a marinade of only five ingredients: tahini, toasted sesame oil, honey, and S&P. And substituted chicken. Because frankly, as much as we love turkey, we really felt that this NEEDED to be chicken.

I can't speak for the quality of the original recipe, but J's take on it was delicious. The tahini in the marinade created a really fantastic crust on the outside when the chicken was cooked, and kept the inside moist and tender. The sesame flavor was made even more prominent by the addition of the toasted sesame oil, with just the barest hint of honey sweetness. Next time I think I'd squeeze a bit of fresh lemon over the chicken after cooking, just to further balance out the flavor, but as it stands it was savory and aromatic and wonderful.


The soup was, I think, a bit of a revelation for J and a proof of concept for me: gazpacho can, in fact be GOOD, and it doesn't have to be Mexican.

Gazpacho is something that always sounds really great to me in theory, but always disappoints in reality. I mean, I really can't imagine anything more summery and refreshing than a bowl of cold, fresh tomato soup, but anytime I've ever eaten it or made it myself I have really not liked it at all. But recently I had a wonderful lunch at Grayz in Manhattan during NYC Restaurant Week 2008, and my first course was essentially a gazpacho with an Italian twist. Chef Kuntz called it "Two Tomato Coulis with Three Basils", but whatever it was called it absolutely blew my mind. What struck me most was how simple, natural, and fresh the tomato flavor was - it was obvious there was very little in this soup other than the tomatoes themselves, with the upper flavor notes provided by a fresh garnish of chiffonade basil leaves and a drizzle of olive oil. I absolutely had to learn to make it myself.

Further research showed that the soup was just as simple as it seemed - basically its just a bunch of tomatoes all whizzed up in a blender with some garlic, salt, sugar, and white pepper. Thinking about that, I realized that what I don't like about other gazpachos is the other ingredients that get added; the bell pepper, cucumber, onions, jalapeno, and whatever else just cover up the flavor of the tomatoes. The fact that I've never been a big fan of cucumbers probably doesn't help, but for whatever reason it never really occurred to me to leave them out. I almost never follow recipes as-written, but I just never thought about altering this one. I know, it makes no sense to me either. I was tempted to smack myself in the forehead once I figured this out, but was afraid J might think there was something wrong with me.

Anyway, moving on.

I'm going to include the recipe here, because the soup was delicious and I savored every bite just the way it was. However, I think I could execute it better and really clarify the flavors into something much simpler and cleaner on the next go-around, so expect to see this recipe revisited probably in the very near future..

Greek Gazpacho with Fregula Sarda
Fregula sarda (sometimes spelled fregola) is an Italian pasta variety from Sardinia (I know, even MORE of an identity crisis - this poor soup must be so confused). It looks rather like Israeli couscous, but the "grains" are toasted rather than simply dried, providing a distinctly nutty flavor to the cooked pasta. I used them here mainly to add some textural complexity, which worked really well. Its not something that is particularly easy to come by, though, so you could substitute in orzo pasta, rice, or Israeli couscous, or leave it out entirely - it won't affect the flavor of the soup either way.

And yes, I used canned tomatoes for this (for shame!) because they were all I had on hand. Obviously that's something I would change next time around.

1 14oz can diced tomatoes
1 cup chicken or vegetable stock or water
2 cloves of garlic, minced
1 tbsp each fresh chopped oregano and rosemary
1/4 cup sundried tomatoes, chopped
1 pepperoncini pepper, seeded and chopped
1/4 cup green olives, chopped
1 tbsp red wine vinegar
S&P

1/4 cup fregula sarda
1 1/2 cups chicken stock or water

Toppings: fresh lemon juice, crumbled feta, chopped fresh parsley, and good extra virgin olive oil

To make the fregula sarda: heat the stock or water to boiling in a saucepan. Add the fregula and stir to keep the grains from sticking, then cover and cook for 10-15 minutes or until most of the water liquid has been absorbed and the grains are tender. Remove from heat and set aside - the grains will continue to soak up mist of the liquid that is left. If you like, you can rinse them in a colander before serving to remove any residual starches, but I didn't bother.

To make the soup: place all ingredients except for the lemon, feta, and parsley into another saucepan and stir to combine. Place over medium heat and simmer for 10 minutes or so, or until all of the components are soft enough to blend. Remove from heat and either puree right in the pan with an immersion blender (my favorite method) or pour into a standing blender and puree until smooth. The mix could then be strained through a sieve or tammis for a super-smooth product, but again, I didn't bother. Taste for seasoning - I found that my soup needed no salt at all and just a bit of fresh-cracked black pepper. White pepper would also be a good option, but I didn't have any fresh.

Pour the finished soup base into a sealable container (or into a bowl and cover with plastic wrap) and chill for at least an hour. You don't want this to be ice cold, but you don't want it warm either.

To serve, divide the soup base between two bowls. Gently spoon half the cooked fregula sarda into the middle of each bowl, then top with a squeeze of lemon, a sprinkling of feta and parsley, and a drizzle of good olive oil.

********************
Notes for next time: Aside from the fresh vs. canned tomatoes thing, I would like to simplify the soup base a bit by removing the olives and using them instead as a garnish when serving. The rosemary may have been unnecessary, so I think I'd omit it completely. I'd also like to cut out the cooking process, which I think will be a necessity if I use fresh tomatoes, so I'm expecting to need to strain the soup next time around to get rid of any little bits of the tougher ingredients (thinking of the pepperoncini here) that won't break down into the soup without cooking. Other changes may present themselves when I try this again that I can't anticipate right now, but we'll see.