Wednesday, October 22, 2008

Hooray inspiration

I think I'm in love.

Not necessarily with the Halloween ones (that's a little too fiddly for me) but the basic ones... they're like truffles for n00bs! I think even I could manage these! And they're so cute!

(You can tell I'm excited by my apparent inability to resist using exclamation points.)

I'm going to be home alone again on Friday.... I think I know what I'll be doing ;)

Also, I've been following the votes on the Ile de France Recipe Contest and finally realized that the recipe that is currently way out in front is, in fact, by Bakerella herself. That's it, I yield. I can't compete with her readership, and lets face it, her recipe far surpasses mine in originality and creativity (and her photos are actually pretty). So, congrats in advance Bakerella, I think you'll have earned this win. :)

Thursday, October 16, 2008

Ile de France Recipe Contest

Hey folks, the Ile de France recipe contest entries have been posted, and its time to vote! If you liked my panini recipe, please go to the blog and cast a vote for me!

My entry

Full entry list

Friday, October 10, 2008

Barefoot Bloggers: Butternut Squash Risotto

Well, it seems fall is officially here, if this month's selections for the Barefoot Bloggers are any indication. I have to say I was thrilled to see that this Butternut Squash Risotto was on the list for October - I've been wanting to make something like this ever since I first discovered that I liked butternut squash (perhaps 3 years ago) but we make risotto maybe once a year, and J's really not a fan of winter squash so this one never made it onto the to-make list.

But, conveniently, J was out this evening, attending opening night for the New Jersey Devils with a friend (and man, am I jealous...) so I had the perfect opportunity to make this dish all for myself.

Thanks to Rachel of Rachel Likes to Cook for picking such a great recipe!

Now, onto the food.


For the most part, I stayed true to Ina's original recipe. I wouldn't be me, though, if I didn't make a couple small changes. First, as usual, I halved the recipe. I added a few extra seasonings along the way (most notably garlic) because it felt necessary. I had to omit the saffron because I forgot that I was out and didn't buy more, and didn't realize this fact until I was gathering my ingredients tonight. Doh! Same goes for the shallots, which I subbed with red onions because, much like the last BB recipe, I realized belatedly that we'd used all of our shallots in the previous evening's dinner. Also the parmesan, which I subbed with 1-year-aged manchego because I had it in the house and I thought its nuttiness would complement the autumnal flavors in the finished dish. And the white wine, which I subbed with a mix of lemon juice and red wine vinegar - may sound weird but added a really wonderful tangy undertone to the finished risotto that I happen to love. I also cut way back on he butter, because I just don't think there's any need for even 4 tablespoons of butter in my halved version - 1 did the job just fine.

Actually, I guess I made a lot of changes... but, I'm getting ahead of myself.


The first step in the recipe is to cube up some fresh butternut squash and roast it. I think this was the most difficult part of the whole process, honestly - cutting butternut squash is HARD. Its really dense and hard, and even using our heaviest and sharpest chef's knife I really had to lean on it to get through the squash. I ended up using just the thinner "neck" portion of the squash for this, saving the round base for another as-yet-undefined use. Peeling was easier than I'd expected, and once I'd gotten the big piece halved it was a lot easier to cut up the rest of the way. I made rather smaller cubes than Ina specified, because I didn't really want massive chunks of squash in the finished risotto - they were probably closer to 1/2" cubes than 3/4".

The cubes went into a foil-lined baking dish and got tossed with some olive oil, a sprinkling of salt and pepper, and a bit of garlic and sage for some extra flavor. Then it was into 400 degree oven for about 20 mins while I got some of the other prep work done.


First, the easy step - putting some chicken stock on the stove to heat up. Then the slightly-harder-but-really-nothing-resembling-a-challenge step of dicing up some red onion, garlic, and pancetta.

Slight aside, but I love the way pancetta looks. I love the spiral pattern of the slices, and then striated white and red layers when you cut into it.... its one of those ingredients that looks lovely just as it is, with no adornment.

Anyway, at this point I looked in on the squash and decided that it was just about soft enough, but I wanted it to be a little more browned, so I switched the oven from bake to broil for about 5 mins - that way they came out soft and golden brown and slightly crispy on the outside, sort of like roasted potatoes. I ended up snitching quite a few cubes while I was cooking because they were insanely tasty just as they were.


Once the squash was out of the oven, it was time to start the risotto.

I got a tablespoon or so of butter melting in a large saucepan, then added the pancetta cubes and let them render slowly over medium-low heat to bring out their tasty fats and crisp the cubes. Ina's recipe has you add the pancetta and shallots (or in my case, onions) at the same time and just leave them all in the pan while the risotto cooks, but I knew that'd just make the pancetta chewy. So instead I did added this rendering step, then removed the cubes from the pot and tossed them in with the squash cubes to add later - this way, they'd stay somewhat crisp in the finished dish.

The onions and garlic got added to the melted butter and rendered pancetta-fat and stirred around until they were softened and just a bit golden around the edges. Then, in went the rice, which was also stirred around until the outer layer of each grain turned translucent.

I deglazed the pan with an equal mix of lemon juice and red wine vinegar, about 1/4 cup total, and cooked until the liquid had almost entirely evaporated. Then I added my first ladleful of stock.

And this is where the magic of risotto happens. From Wikipedia:

"The rice is first cooked briefly in butter or olive oil to coat each grain in a film of fat, this is called tostatura; white wine is added and has to be absorbed by the grains. When it has evaporated, the heat is raised to medium high and very hot stock is gradually added in small amounts while stirring gently and almost constantly: stirring loosens the starch molecules from the outside of the rice grains into the surrounding liquid, creating a smooth creamy-textured liquid." More...

So, I spent the next half-hour adding hot stock to the risotto one ladleful at a time, stirring not constantly, but often enough to be sure the liquid was moving around the individual grains of rice and nothing was sticking.

While that was going on, I went ahead and grated some manchego so it'd be ready to toss in at the end.

Finally, all the stock had been added and the risotto was cooked, creamy and barely al dente. I took the pot off the heat and stirred in the grated cheese, roasted squash, and crispy pancetta. Spoon onto a serving dish, top with some extra cheese, and its time to eat!


Oh. My. God.

This was good. Terribly good. Wide-eyed-back-of-the-throat-moaning good. Rich and creamy, highly flavorful, savory and ever-so-slightly tangy, with shots of slight sweetness from the pieces of squash and saltiness from the pancetta. This was the best risotto I've ever made, by far, and easily the best thing I've put in my mouth since last week's visit to the North Fork (more on that later). And I almost think that J might like it, as the squash flavor itself wasn't really that strong.


It is, however, VERY rich - I was only able to eat a small bowl for dinner, and had to put the rest away for probably at least two more meals. I definitely think its best eaten as a side, perhaps with a green salad or a simple herbed chicken breast, or some roasted vegetables. I'd actually intended to make some roasted brussels sprouts to have with, but I forgot, and its just as well because I couldn't have eaten them with the amount of risotto I dished out for myself.

Not the healthiest dinner in the world, but definitely delicious... and one of the things I love about risotto is that although it looks and tastes decadent and horribly fatty, when it comes down to it, its really not that bad in terms of fat content. A bit of butter and olive oil (the way I make it anyway, which I guess is significantly lighter than s traditional), and the fat from the pancetta - that's it.

I may just have to bring this out at the holidays this year - I think it'd be popular at Thanksgiving or Christmas dinner, and it'd certainly impress the hell out of either of our families. ;)


UPDATE: J tried some of my leftovers last night as a late-night snack, and he loved it so much he ate it all! (Though I did manage to snitch a couple bites myself.) I guess this one really is a keeper. Plus, I now understand that the only application of butternut squash that he's had is halved and roasted squash, which is apparently what he doesn't like, and he's open to trying it in other ways. I think we'll have to use the rest of the squash a side one night this week and see if I can change his mind about it.

Wednesday, October 8, 2008

Ooey Gooey Crispy Savory-Sweet Heaven

Its not often that we make sandwiches here at Table for Two. Mostly because we try to keep our carb intake at a pretty low-level, and sandwiches are arguably defined by the bread they're made with. Don't get me wrong - I love bread. I love it in a way that is not entirely healthy or chaste. But if I ate it all the time I'd be a whale.

That being said, part of the appeal of receiving that free sample of Ile de France cheese was the opportunity to enter a recipe contest using the cheese. And as much as I love soft-ripened cheeses exactly as they are, I really go ga-ga for them when they're given a bit of heat and turn into molten, decadently-creamy bliss. And I also think that this particular application of the cheese is perfectly suited to sandwiches, particularly pressed sandwiches, where the heat melts the cheese and helps it act as a binder for all the other fillings. So, upon receiving and tasting my wheel of camembert, I just knew that it needed to go in a panini.


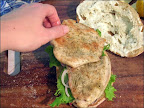
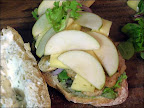
I'll admit, this maybe isn't the most original sandwich recipe in the world, but it IS sinfully delicious. Crispy-outside/tender-inside ciabatta rolls are spread with a lemon garlic aioli, then topped with fresh, vibrant spring mix, crunchy and pungent red onions, herb-rubbed turkey cutlets, slices of camembert, and finally, sweet apples. In the absence of a panini-press or, perhaps, a George Foreman grill (my favorite and most-missed kitchen appliance from my two years living with three friends in Queens), the sandwiches got wrapped in tin-foil and pressed beneath foil-wrapped bricks that had been heating in the oven for almost an hour.


The final product is a significantly flatter, crispy, crunchy sandwich just oozing with ooey, gooey, melty cheese, acting as the glue between the turkey, apples, and roughage. Biting into this sandwich is like getting a little taste of early fall, warm and comforting with the aromatic flavors of autumn produce and herbs. This is one we'll be making again, for sure.

------------------------
Pressed Turkey Panini with Camembert and Apples

Its fairly easy to get thin-cut turkey cutlets in most grocery-stores nowadays - we're partial to Shady Brook Farms, ourselves, and buy them often. This time, we bought a whole boneless breast from Iavarone and sliced off four cutlets ourselves, pounding them to an even thickness before cooking. Whatever method you use, just be sure you have enough turkey (one cutler or two) to create a single even layer on the sandwich.

Also note that we aren't going for overstuffed, here - the key to this sandwich is even distribution of fillings and the proper balance of flavors, and a huge sandwich will never press correctly.

I'm writing this recipe using our hot-brick method, but if you happen to own a panini press or George Foreman grill, you can use that however you normally would.

4 thin turkey cutlets
1/2 tsp poultry seasoning
1/2 tsp salt
1/4 tsp black pepper
1 tbsp olive oil

1/4 mayonnaise
1 clove garlic, grated
1/4 tsp black pepper
zest of one lemon

2 fresh ciabatta rolls
1 cup spring mix salad greens or arugula
1/2 small red onion, sliced thin
1 small sweet apple, cut into 1/4 inch thick slices (we used a Macoun but any sweet or semi-sweet variety would do)
4 oz Ile de France Camembert, cut into 1/4 inch slices (trim the rind if you like)


Preheat your oven to 450 degrees. Wrap two bricks in foil and place in the center of the oven and allow to heat for 45 minutes to an hour.

For the turkey:
Sandwich the turkey cutlets between two sheets of plastic wrap and pound then gently with a meat mallet to flatten and tenderize them - you want them slightly less than 1/4 inch thick. If your cutlets are already very thin, you can skip this step.

Season the cutlets with the poultry seasoning, salt and pepper.


Heat the oil in a large skillet until a drop of water flung into the pan pops and sizzles. Carefully add the turkey and sear on each side for about 2-3 minutes until golden brown and cooked through. Remove from heat and set aside.

For the aioli:
Stir together the mayo, garlic, lemon zest and pepper.

To assemble the sandwiches:
Split the ciabatta rolls and pull out some of the bread from the center - this will make more room for the fillings and keep them from being squeezed out during the pressing step.


Slather the tops of the rolls with the aioli. Stack the fillings on the bottom half of the roll, starting with the salad greens, followed by the red onions, then the turkey cutlets, the cheese slices, and the apples. Divide your fillings evenly between the two sandwiches, and don't try to use all of them if you don't have room. Remember, less is more here.


Finish with the tops of the rolls and press down slightly with your hands. Wrap each sandwich tightly in tinfoil, and place on a baking sheet.


Using hot pads/oven mitts, carefully remove the now VERY hot bricks from the oven. Again carefully, place one brick on top of each sandwich, pressing down to be sure they will be stable. Place the entire baking sheet back in the oven to give the sandwiches a chance to heat through - 5 minutes or so should do it.


Remove from the oven and remove the bricks. Unwrap the sandwiches enough to expose the tops of the rolls, then replace the bricks or a few minutes to crisp up the crust. No need to put them back in the oven for this - the sandwiches will be plenty warm and the bricks will have retained enough heat to do the job.


Remove the bricks to a safe place to cool down, cut the sandwiches in half, and enjoy!


This is my entry for the Ile de France recipe contest. If you like this recipe, please visit the Ile de France blog and vote for me between October 16 and November 3!

Tuesday, October 7, 2008

Ile de France Camembert

Last month I received an email from Alex at Ile de France cheese, asking if I would be interested in getting a sample of one of their cheeses in exchange for a review here on Table for Two and the opportunity to participate in a recipe contest they were sponsoring. Hardly being one to turn down free cheese, and intrigued by the contest, of course I accepted.

Given the choice between their signature brie, goat cheese, and camembert, I chose the camembert - I like mild, soft-ripened cheeses like brie and camembert a great deal, but I've eaten a lot of brie in the last couple of years and wanted to try something new.

From Wikipedia:

"Camembert is a soft, creamy French cheese. It was first made in the late 18th century in Normandy in northwestern France. [It] is made from unpasteurized cow's milk, and is ripened by the moulds Penicillium candida and Penicillium camemberti for at least three weeks. It is produced in small rounds, about 250 grams in weight, which are then typically wrapped in paper and packaged in thin wooden boxes. When fresh, it is quite crumbly and relatively hard, but characteristically ripens and becomes more fluid and strongly flavoured as it ages." More...


My sample arrived via airmail in its traditional round balsa-wood box, and unwrapping the inner paper revealed a semi-dry, almost papery white rind. The cheese seemed fairly firm to the touch, quite similar to the texture of most bries I've sampled, indicating that it had not aged for terribly long.

As a first taste, I sliced a small wedge and trimmed off the rind (I know that's sort of a point of debate when eating these cheeses, but I generally remove it - I don't like the way it feels on my tongue and feel it takes away from the experience of the cheese itself) and ate it just as it was. The texture was creamy and smooth, showing just the slightest resistance to my teeth before melting over my tongue. The flavor was mild but aromatic and earthy, with a subtle tang that lingered after swallowing and an ever-so-slight nuttiness and fungal aftertaste. Put simply, it was delicious: complex enough to make eating even a small piece interesting and surprising, but not strong enough to feel like it was slapping me in the face.

J and I shared about half of the wheel as an appetizer before dinner one night, paired with some granny smith and macoun apples and some dry white wine, and this was where I felt the flavor really started to shine. The two varieties of apples brought out different elements of the camembert's flavor and aroma: the tart granny smiths seemed to highlight a subtle sweetness in the cheese that I hadn't noticed when eating it "straight" while bolstering its back-end tang, and their crisp texture provided a wonderful foil for the cheese's smooth, creamy texture; the sweeter, softer macouns almost melted on the palate along with the cheese, and shone a spotlight on its nutty, almost caramel undertones. Both apples seemed to help to downplay the fungal flavor that is common and desired in ripened cheeses, and which is generally the only element of them that could make me turn up my nose... I'm still not sold on veined or blue cheeses for just that reason. It isn't strong in this cheese so it's not really a point against it, but I definitely enjoyed it more with the apples to mellow it out a bit.

And that being said, I should make a disclaimer than I realize these types of cheeses are SUPPOSED to taste fungal and, well, moldy - its the mold that makes cheeses like camembert what they are. I love cheese but am hardly an expert, and in truth I think I've only had one camembert before this, so unfortunately I don't have much of a basis of comparison to draw from. I suspect, however, that this is a particularly mild variety, and as such I found it entirely pleasant to eat and cook with (more on that later).

As an amusing sidenote, this past weekend I sought ought another variety of camembert in the hopes of having something to compare this one to, and I ended up with a cheese that had been aged for about 5 months - this one was soft and runny, and so strongly bacterial in flavor that I simply couldn't enjoy it. Frankly, it tasted like dirty socks, and its hanging out in our meat drawer in the fridge while I ry to figure out something I can do with it to mellow out the flavor so I won't waste the $12 I spent on it.

Clearly, I'm not quite ready for long-ripened cheeses. For now, I think this one is just right for me.

Thanks Alex, for giving me the opportunity to sample Ile de France's product and write this review! I hope I'll get to try some others later on down the road - I've got my eye on that goat cheese. ;)

Friday, October 3, 2008

A Lot from a Little Series 1, Post 4: Smoked Chicken & Cremini Crepes with Two-Cheese Bechamel

I'm starting a new semi-regular feature here at Table for Two, in which I will try to offer some tips and tricks on eating well without breaking the bank, especially when cooking for a small number of people.

A Lot From A Little Series 1, Post 1: How to Smoke a Chicken
A Lot From A Little Series 1, Post 2: Grilled BBQ Smoked Chicken Pizza
A Lot From A Little Series 1, Post 3: Smoked Chicken Salad Over Greens

My final offering to you in this smoked chicken series is something you might not consider when trying to decide how to use up what's left of your beautiful mahogany-skinned bird. I've mentioned many more-commonplace ideas if you're looking for something comforting and simple, but if you'd like to be a bit more adventurous, well, you ought to give this a try.

Crepes are one of those things that are so damnably versatile, I sometimes wonder why we don't use them more often. They can be savory or sweet, flavored with all manner of additives in the form of herbs and spices, and can be filled and topped with almost anything you can imagine. Sure, they can be a little fussy to make, but I gotta tell ya: my first ever attempt at making crepes was a pretty solid success (though admittedly imperfect) and I can't imagine why I was ever afraid of them.

I'll take my cue, once again, from the great Alton Brown (can you tell he's my hero?) and say that the key is really to have the right pan.

I suppose I'm lucky in that we just happen to have the perfect pan for making crepes in our cupboard. Its shallow and nonstick, with a gradual curve at the sides that allows for easy turning and removal of the crepes and ensures even cooking and shape. I don't actually know where this particular pan came from - I suspect its a hand-me-down either from J's parents, or from his ex's. Either way, I'm grateful to have it, because that's one less kitchen implement I need to buy.

Seriously though, I definitely think that the pan is essential to turning out great crepes. A deeper pan with higher sides and a steeper wall would make it awfully difficult to get a spatula under the thin, delicate crepes without tearing or folding them, and lord help you if its not nonstick. You'll need a lot of butter to make that work. And its certainly not a unitasker (which AB would frown upon) - it can easily be used for omelets or pancakes, and has frequently stepped in as a perfect sautee pan for small amounts of food, which is especially useful on the rare occasion that I'm cooking for myself alone.

Aside from that, I'd recommend trying out AB's crepe recipe first, if you're a crepe n00b. Its simple and straightforward and practically idiot-proof - the only thing that can be tricky is learning the correct amount of batter to use for each crepe, but you'll get the hang of that with practice.


For this particular recipe I used some savory crepes flavored with thyme that I'd made awhile back and frozen for just such an occasion. I reheated them (2 for each of us) in a low-temp oven while preparing the filling and sauce, and they worked just fine - a bit too crisp around the edges, perhaps, but it didn't really hurt anything, so I'd say there's no reason why you shouldn't make your crepes ahead of time. If you've got the idle hours, though, by all means, make them fresh. They'll always be better immediately after cooking.

The filling was incredibly simple - I took a handful of cremini mushrooms and half a white onion and sliced them all thinly, then sauteed them until they were soft and golden. Then I added in the remainder of our shredded smoked chicken with some fresh thyme leaves, a squeeze of lemon juice, and a fair amount of fresh-cracked black pepper. When everything was hot and slightly browned and crisp in places, I removed the mix from the heat to let it cool slightly.

The sauce was a simple basic bechamel with some shredded cheddar and smoked gouda thrown in, along with a goodly amount of black pepper. I made it while the filling was cooking, because I happen to enjoy multi-tasking.

To assemble, I just rolled up a few tablespoons of the chicken and mushroom filling in each crepe, then spooned the bechamel over top. That's it. Done. Simple, right?


It sure didn't taste it, though. And it looked darn fancy to boot. You'd never believe you could have such a seemingly gourmet meal on a weeknight, but believe me, you can. This didn't take more than half an hour from start to finish.

This is one of those recipes that is definitely more than the sum of its parts. The filling was smokey (obviously), earthy, bright from the lemon and slightly sweet thanks to the slight caramelization on the onions. The crepes themselves were woodsy and savory, and the cheesy bechamel was rich, tangy, and highly flavorful without being overly heavy, thanks to the 2% milk I used in place of whole milk or cream. It was perhaps a touch to thick, but I'm still perfecting my bechamel-fu.

Served with a simple green salad, this was a decadent and satisfying meal that made us feel oh-so-special on a Thursday evening, and was the perfect last meal for our wonderful smoked chicken. I'm not sure it'd be quite as good with regular old roast chicken, but it was good enough that, well, I'm willing to try.

This concludes my first "A Lot from A Little" series! There'll be more where that came from in the future, so stay tuned!

Wednesday, October 1, 2008

A Lot from a Little Series 1, Post 3: Smoked Chicken Salad Over Greens

I'm starting a new semi-regular feature here at Table for Two, in which I will try to offer some tips and tricks on eating well without breaking the bank, especially when cooking for a small number of people.

A Lot From A Little Series 1, Post 1: How to Smoke a Chicken
A Lot From A Little Series 1, Post 2: Grilled BBQ Smoked Chicken Pizza

Now, I'm going to admit something right off the bat here: this didn't come out all that good. And that's a tragedy to me, because it ended up being a waste of a lot of really tasty chicken. However, I'm going to post about it anyway, partly because despite our failure this is still a perfectly valid way to use up that chicken, but mostly because I'm hoping someone might be able to give us some ideas of how better to execute this dish. Because honestly, it SHOULD have been awesome.

The idea was to make a standard mayo-dressed chicken salad more interesting by using the smoked chicken in place of the usual poached chicken, and eat it over some mixed greens for a somewhat healthier lunch than sandwiches. It didn't seem like it ought to be difficult, so we followed our usual method for salads like this: mix up some light mayo and mustard with chopped red onion, celery, and carrots; lighten it up with a splash of red wine vinegar and balance it out with a bit of salt, few grinds of black pepper and a drizzle of honey; add in the shredded chicken, mix it up, and eat. Simple right?

Well, I'm not sure what went wrong, but it just didn't work this time.

Part of the problem was that it was overdressed, I think - the salad was on the runny side and that generally kinda grosses me out when it comes to mayo-based salads. I also think we made a mistake by salting the dressing, as the chicken itself had a fair amount of saltiness from the brining step. And we decided to toss in some finely chopped fresh parsley this time around as well, which really didn't work at all for me. I'm a little picky about parsley, admittedly, but I think it was overpowering here.

Regardless, neither of us was thrilled with it. We each took it for lunch one day out of the week, and the rest went in the trash... heartbreaking, when I think of how good that chicken was, and also embarrassing as I'm trying to write about getting the most for your money here, and I just threw out a third of a chicken's worth of meat. Sigh. Unfortunately, there was just no rescuing it.

This marks the third time, now, that we have attempted to make chicken salad with smoked chicken, and while the previous attempts were better than this one, none have been exactly stellar. It makes me wonder if we need to try a completely different approach, because I feel certain that there must be a way to make this work. Perhaps a mayo-based salad would work if it was VERY lightly dressed, and the dressing was VERY simple. Or perhaps we need to play with seasonings or explore other options for a creamy salad base (Greek yogurt, perhaps?). Or maybe we should abandon the creamy salad idea completely and go a different direction, using perhaps a vinaigrette dressing instead.

Anyway, aside from this being a disaster from a taste perspective, it was a success from a stretching-your-ingredients perspective - using about a third of the meat (mostly white meat) that was left from our bird, we had easily enough salad for us both to have lunch for 3 days or so. Its a shame we couldn't actually follow through with that plan.

So folks, anyone have any brilliant ideas to make a smoked chicken salad that actually works?

Next up in this series: Smoked Chicken and Cremini Crepes with Two-Cheese Bechamel